I wanted to update my blog in response to some recent questions about the Orion Balisongs. These knives are going to be super popular when I release them, but in my usual tradition, I wasn't really satisfied with the status quo.
Still designing, from initial prototype to final it's probably going to be a couple months just working on this knife. Balisongs are hard because theres so many little features people want in a knife and you still have to get your own unique style in there somewhere. I'm trying to include the community on this one in addition to making a knife that I would personally want, so it's a balance that I'm trying to get right on this one. At the end of the day, I do hope this is a popular knife, just like I hope all of my work is popular.
So I just wanted to update you guys on some of the final thoughts and modifications I had before sending DXF's off to my water jetter. I swapped a few things around on the innards and I'm making a couple prototypes to see how they work out.
The first is a regular tang pin construction with the latchless titanium handles, which will likely be the one I end up taking to market.
The second is a concept knife, and includes a few ideas I had. The first big change is the removal of the tang pins. It uses internal stop pins which are machined into the handles and interface on the inside of the tang of the blade as the stops. This eliminates the need for tang pins AND zen pins, a system that as far as I know is unique to this Bali (although not entirely unique to regular folders). It does mean I will have to make my own washers for the system, but I want to see if this kind of system is even possible. Theoretically, along with the tolerances I'm holding using CNC and waterjetting, it should eliminate most if not all of the play in the handles characteristic to Balisongs. The second big change is the latch; I have a tentative design for the latch kit which I will be testing, and I'm making myself on the CNC Mill.
The latch consists of a trunion which fits into where the original latchless standoffs were but utilizes a spring loaded ball bearing detent which locks into place with a predetermined amount of force dependent on the spring and size of the bearing. Instead of using a T latch or a spring latch which interface with the bite handle, my Inertial Opening Latch locks into a bearing detent in latch and can be opened with a heavy flick of the bite handle whilst holding the safe handle. This overcomes the bearings detent and breaks the latch free without having to use an external toggle or tang on the latch.
I'll still put an extended tang on the latch if you still want to use that to open the latch, but it enables you to open the Bali with one hand and a good flick of the wrist. Again, this is a system that as far as I know is unique to this Bali, and I've never heard of it being used in this application so I went ahead and filed a mechanical patent for the system. I'm not saying all of the latches will be like this, but it's an option I'm considering right now. I may just go with a standard T latch kit for the drop ins. However, if I can get it to work properly, it'll be brilliant.
For those of y'all concerned with weight, I sourced some magnesium for the handles. I will do an ultra-lite version of the knife with magnesium handles, which gives you a 5 inch Bali with .2 inch thick handles and a .2 inch thick blade weighing only 5.6oz. Magnesium is the strength of a good quality stainless, so it should be the lightest, strongest 5 inch Bali in the world. Of course all the handles are interchangable, so if you decide you want to go back to Ti or you want to add Magnesium handles at a later date, you'll be able to do that with drop in handles, since they'll all be watercut to extreme tolerance.
Will
Friday, December 30, 2011
Friday, December 23, 2011
Merry Christmas from Will Moon Custom Knives!
I just wanted to post a quick Merry Christmas to all my readers, friends and customers! It's nearly that time for presents, embarrassing photos, gaudy holiday sweaters and my personal favorite, the delightful cloying sweetness of eggnog. I'm joking of course, but in all seriousness, I love Christmas, it's a great holiday and I want all of y'all to enjoy it, take a break from the stress of life, spend some time with your friends and family and get back to the things that really matter, if only for a couple days.
I'll be taking a brief vacation for a couple days following Christmas, with normal service resuming sometime around the first of the year. Thanks guys for a great 2011, I look forward to 2012 and another great year!
Merry Christmas!
Will
I'll be taking a brief vacation for a couple days following Christmas, with normal service resuming sometime around the first of the year. Thanks guys for a great 2011, I look forward to 2012 and another great year!
Merry Christmas!
Will
Proper vs. Improperly done Heat Anodization
So one of the big trends these days is to modify your knives. I do it, it's a pretty big part of my business for now, and I know a lot of guys like modified and customized production knives as a cheaper alternative to high priced customs. One of the biggest things most people do to their knives is heat anodize their titanium, or "flame" their titanium, and I wanted to offer a bit of insight on this process.
Heat anodization works by artificially coaxing the natural oxides that grow on titanium over time to bond more readily with the oxygen in the air. Titanium oxide relects light differently based on how thick it has grown, and so the colors change from a gold to purple to blue, and so on. The same effect can be achieved by electrecution, but this is the poor man's way of doing it which doesn't require any kind of titanium wire, conductor solution or power source.
The biggest problem I see people encountering is that their "flaming" looks extremely dull after it's finished. To give you some comparison, I heat anodize nearly all of my knives, custom and customized, and they look extremely bright:

The problem I have found is most customizers "flame" media blasted titanium, and this does not produce a very bright effect, but rather a subdued and (in my opinion) inferior looking finish. While there are different ways of achieving good results in brightening up the finish, I prefer hitting the buffing wheel. It takes a very long time to polish titanium correctly and it needs to be taken to a mirror polish. On top of that, one of my signature finishes, the Cosmic finish, is jeweled after polishing, producing a further holographic effect which looks great when anodized.
After mirror polishing, anodization isn't as straight forward as taking a blow torch to titanium. It requires some significant finesse to get the finish even, and not everyone has the patience to do it. The Cosmic finish, for example, is a very specific shade of purple/blue in which the centers of the jeweling swirls turn blue but the rest of the titanium is left purple, and this is extremely difficult to do with heat anodization given the time it takes to turn purple colored titanium to blue is near instantaneous. After anodizing I usually polish the titanium further to make sure there is no carbon residue from the torch and let it cool naturally.
As far as maintaining a good heat anodized finish, it's relativly easy. Inferior "flamed" finishes will wear off with time as the titanium's media blast scratches. However anodized titanium is actually harder wearing than unanodized titanium and has a tendency to hide minor scratches, especially my Cosmic finish, which wears nearly as well as a stonewash. Anodized titanium does need to be cleaned occasionally as the oils from your hands will cause the finish to dull over time. Washing the titanium with warm soapy water and then drying lightly on a towel will restore the finish to luster and is the best way to keep your properly finished heat anodized Ti looking good. After several years the finish will wear down, in which case it's very simple to reanodize the titanium, and this is a service I do for free under my warrantee.
If you have any questions about anodizing titanium or my refinishing services, please feel free to send me an email to willmooncustomknives@gmail.com. Good luck and Merry Christmas!
Will
Orion Continued: changes and modifications
The Orion Balisong project continues. I am still currently in the prototyping stages for the new butterfly knives, and I have some news. Without divulging too much information as to the final product (because simply put I don't know quite yet exactly what it's going to be made out of or look like), I spent most of the day yesterday putting my design in Solidworks, and so far I think I have a workable latchless model. The T-Latch version will come at a later time.
Since there seems to be a relativly large latchless Balisong following, I think the first run of these knives will be without a latch. I have modified the design so that it now has precision ground stainless steel standoffs for weight, and beefed up the tang pins to eighth inch steel rod.
Because I have CAD models now, I'm strongly considering having the blanks of the blades and handles water cut to save on time and cost and allow me to offer an overall more affordable product. The blades would still be hand ground, all fit and finish done by hand with custom handles available. However, this would allow me, for example, to more precisely control the handle fit and create a tighter Bali for the end user. If I end up going with waterjet cut parts, it will significantly reduce the cost and allow me to use higher end materials, like titanium handles and nicer blade steels, so it may be worth it. I will have a prototype made this way and see how expensive it turns out to be, and then I will make my final decision as to the construction methods of the Balisong.
Keep posted...
Will
Sunday, December 18, 2011
New Knife Customization: Orange Crush Benchmade/HK Nitrous Blitz
I just finished up a new customized knife, this one based on my favorite knife of all time, the Benchmade/HK Nitrous Blitz. For those of you who follow me on Youtube, you'll know why I love this knife so much, it's lightweight, it's affordable, it's ergonomic, it has a killer assisted opening mech, it has great materials... there's honestly only one thing I'd criticize about the knife- it's somewhat lackluster appearance.
But with a little Orange G10 and some mosaic pin I can correct that...
But with a little Orange G10 and some mosaic pin I can correct that...
Tuesday, December 13, 2011
December Update: Changes in service
Hey all,
I just wanted to update my customes and followers on a few changes I'm making to my business.
Firstly, a couple words on international shipping and perhaps biggest change, I'm discontinuing international shipping for the forseeable future. I have been having a lot of problems with slow international mail service and it's frankly beginning to wear away at my sanity. I just don't want to deal with it anymore, and I'm sick of hearing complaints about slow international mail. As such, I'm not shipping outside of the US anymore. Period. No express mail, no tracked mail, no insured mail. It's just too much of a headache.
Secondly, I'm going to be taking a break from accepting new orders for a while until I get caught up on the stuff that I have already agreed to do/ stuff I want to do for myself. I've been getting pretty burnt out on constantly working on knives during nearly 100% of my free time and I just think that if I continue at this rate I'm going to end up hating the hobby I once loved. As such, for right now i'm not taking any orders. I will still offer the occasional knife for sale tho.
Third, if you're waiting on a knife or think I may have forgotten you, send me an email. I'll get back to you with a status update. I've been trying my best to keep up with the Holiday rush, but one of my biggest fears is that I forget to ship something and then I'll have an angry or upset customer. I'm here to make sure my customers are happy, so if you think you may have been left out please just let me know, I am human and I make mistakes.
With that, I wish you a very Merry Christmas and I really appreciate all the support! Take care!
Will
Wednesday, November 16, 2011
New Customized Knives, Nov. 16th, 2011
I thought I'd take a quick moment and show off some highlights of my customized knives from the past couple months. I'm not going to go into super great detail about what they are, but this is just a quick smattering for y'all to check out.


Kershaw Dress Tremor


Tye-Dye(R) Boker Epicenter

Fancy Les George VECP

Benchmade Dress 750 Pinnacle

Tye-Dye(R) 790 Subrosa and Helena style 630 Skirmish

21 Tomorrow, Nov. 17th 2011
So this is just an informal post, but a lot of guys are surprised to hear how young I am considering what I do. I will be 21 years old tomorrow, Nov. 17th 2011. Finally, I'll be able to buy handguns and booze. Kidding. I'll likely spend the day pouring over books in preparation for exams, and it's looking like it'll be a cold, rainy, miserable day. Still, I have a sneaking suspicion I'll be eating some kind of cheesecake and spending the evening with my girlfriend, Leslie. There may also be some Skyrim or Modern Warefare 3 involved. Hey, I'm a human being too, given a little free time I like to cut loose, I'm not all business.
In celebration I'll be doing a give away on my Youtube Channel, PRSPl4yer. It will only be open to subscribers, so if you're not subscribed, please do so. It'll be a handmade knife I haven't revealed yet ;)
In celebration I'll be doing a give away on my Youtube Channel, PRSPl4yer. It will only be open to subscribers, so if you're not subscribed, please do so. It'll be a handmade knife I haven't revealed yet ;)
And we're BACK! Updates and Announcements, Nov. 16th 2011
I have to say, I've been doing a pretty sheisty job at keeping my Blog updated, I'm sorry for that. School work has taken its toll on my free time, and I've been spending almost every free minute working on furthering my education or pimping out knives. That said, we're winding down in the Semester and I have a little free time to update y'all on what I've been up to over the past 6 months.
I've made huge leaps and bounds, introducing my first Balisong to the market, the Luna-Song, introducing two more fixed blade designs, the Rectifier and the Celestion, making strides towards a tactical folder and another Balisong model, customizing knives at the same time as maintaining a high standard of academic excellence. It's tough, but fun. Here are some shots of the new knives:


I've made huge leaps and bounds, introducing my first Balisong to the market, the Luna-Song, introducing two more fixed blade designs, the Rectifier and the Celestion, making strides towards a tactical folder and another Balisong model, customizing knives at the same time as maintaining a high standard of academic excellence. It's tough, but fun. Here are some shots of the new knives:
Rectifier
4.5 inch S110V Lum Tanto grind, convexed zero ground tip, full crowned handle
Mosaic Tube Fixtures, Translucent G11 scales, Kydex Sheath
MSRP 275$ in S110V

Celestion
3.5 inch ATS-34 Deep V Hollow ground blade, full crowned spine and handle
Mosaic Tube Fixtures with OD green G10 scales, Kydex Sheath
MSRP 175$ in 154CM, 225$ in S110V

Luna-Song
4 inch S110V or 154CM blade, Compound ground with crowned spine
Jeweled titanium liners with G10 scales
MSRP 375$ in 154CM, 475$ in S110V

My knives are 100% handmade in Apex NC, sole authorship except for the heat treat which is done by a local machine shop. You will be able to order any of these models come Christmas of 2011. They mark a dramatic shift in the way I'll be doing business from now on. That leads me to my second large annoucement.
As of Nov. 2011 I am discontinueing customization services until the spring, instead focusing on getting my custom knives perfected. The customizing job has made me extremely unhappy, stressed out, irritable and frankly I'm just tired of it and it's no longer fun for me. It's extremely difficult to keep any kind of reasonable schedule while I'm in school, and I don't like keeping customers waiting. Being a one man army has its downsides, I just don't have the time to do custom knives and pimp jobs, and I'd rather focus on creating the best custom knives that I can. From time to time I may release a customized knife from my personal stash, but as of right now I just don't have the time to keep up with so many things at once.
I will also be keeping my Youtube Channel a little more up to date. If you are not subscribed to my Youtube Channel, PRSPl4yer, please do so. I do give aways and contests for subscribers as well as offer discounts for Channel regulars. In addition to showcase videos, I also have reviews and creative videos. Here's a taste of what I've been up to lately:
Wednesday, June 8, 2011
Introducing the Will Moon Custom Alien Autopsy fixed blade
Most folks know me for my modifications of factory knives, but I also make custom knives too. This is a particularly cool one called the Alien Autopsy. It has my custom crop circle handles that are unique to me, and I have to say, they are wicked awesome.

The blade itself is made of .2 inch thick 5160 on the prototype, but future versions will be in other steels as yet to be determined. On this one I chose to V hollow grind the blade with a "Hinderer" style slicer grind. The result is a knife that cuts and slices like no other even though it's of pretty beefy stock.

The really cool part about this knife, however, is the way the handle glow. Using proprietary techniques, I create a layered G10 material that has glow in the dark "Crop Circles" that shine through the handle scales. They are bright enough to be seen in daylight and take only a little sunshine to get them started.

The best part of the way my handles are put together is they're totally non toxic, food safe and will last hundreds if not thousands of times longer than other maker's glow material because the glow in the dark material is not directly exposed to the outside and is fully incased in G10. My glow handles are also stronger than acrylics like Moonglow because they're fiber reenforced.

Here you can see the handles glowing in broad daylight, albeit in a shady corner of my room. The handle scales are also removable on this particular model in case you need to maintain the knife.

It pitch darkness the scales look really cool. They glow so bright that you can use the handle as a makeshift lantern if need be, but the real purpose of the glow is so that you can locate the knife in the dark.

Overall I'm really happy to begin to offer this wicked cool design. They're 100% handmade from the profiling to the grinding of the bevels and will come with a handmade Kydex sheath. My MSRP on these is 250$
New Knife Completion: Lone Wolf T2 in OD Green G10
I recently fixed up a used Lone Wolf T2 in my shop and wanted to share some photographs with my Blog. This was a pretty involved project. For those unfamiliar with the Bill Harsey T2, it's a now discontinued Lone Wolf knife from the Pre-Benchmade Era. The original scales were made of a plastic nylon molded material and the pocket clip was mounted tip down. Additionally, the finish of the blade was a plain bead blast, one of my least favorite and one of the most non-rugged finishes on the market.

For this T2, I decided the original bead blast finish on the blade had to go. After pulling the blade off the knife, I used scotch-brite pads to hand rub a satin finish on the blade. The horizontal striations are quite fetching I have to admit.

Naturally, I had to build some scales. Lets be honest, nylon scales suck, they're plasticy, don't feel right... just not high quality. I built a set of custom G10 scales out of some OD material I had left over from a run of my custom knives. I think the results were pretty good.

In this photo you'll notice two large holes near the pivot and three smaller ones towards the base of the scales. The original pocket clip can still be mounted for tip down carry using the two large holes near the pivot, but I decided a standard three hole pocket clip would be better and I prefer to carry my knives tip up.

The pivot area was tricky on this build. I had to hand carve out a small recess for the pivot to sink into. It's one of my least favorite things to do, but it came out pretty well.

Overall I'm pretty happy with how the knife came out. I think it looks a heck of a lot better than the standard nylon handled T2's, and functionally it's better now that I've mounted the pocket clip in the correct position.


Sunday, April 24, 2011
Finish Spotlight: Up close and personal with the hand rubbed Satin
Fewer finishing techniques are more valued for their beauty than what's called a "hand rubbed" satin finish. The term satin just refers to a polished finish that still has striation patterns in it that keep it from being a high polish. By hand polishing the blade using an abrasive, not only does one even out the bevels to be perfectly smooth, but this technique leaves nice striations in the blade as well.

Here's a Protech Brend 3 I customized a little while back, but recently I touched up the original bead blast finish by hand applying a satin using 220 grit abrasive and scotchbrite pads. The process is time consuming and requires quite a bit of concentration to get the striations going parallel. That said, I think you can see the results are quite attractive, especially when paired with my custom drill work.

If you would like your blade hand rubbed, feel free to contact me. I charge 30$ for the service due to the time involved, and I can satin finish almost any blade style. Satin finishing can also take out small scratches in the blade that may have been caused by use.

Saturday, April 23, 2011
New Knife Completion: the "Radioactive Toy" Benchmade 425S Prototype
Recently I managed to win a Benchmade 425 prototype off eBay and decided this would be the perfect knife for a Moonglow rescale. Recently Moonglow has become a really popular acrylic substitute for traditional G10, metal or wood handles, but it's also a pretty rare and hard to get material. I had just enough to knock this rescale out, but this knife represents the last of my Moonglow stock.
 The 425 is designed by Mike Snody, and while Snody is an excellent designer, I think the handles could have been a little more interesting on this particular knife. Don't get me wrong, black G10 is great, but Moonglow is so much cooler, don't you agree?
 I had to be very careful when I was working on this knife; Prototypes are VERY collectable, and when it comes to Benchmades, the 425 is one of the most popular. Taking special pains to make sure the original hardware and knife remained unscathed during my build, I carefully made the Moonglow scales by tracing the existing scales onto my Moonglow sheet and ground each scale to fit exactly into place. Then I finished the scales by sculpting them first with 60 grit belts and later hand sanded the scales out to 220 then 600 grit and finally with a scotchbrite pad to help make the scales nice and satin finished. I think the results speak for themselves, eh?


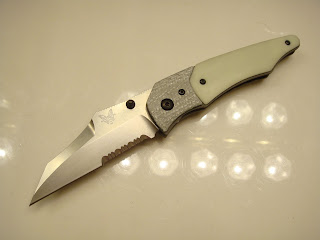


New Knife Completion: "Moon Special" Spyderco Military
I recently got the opportunity to work on a Spyderco Military, and while the Millie presents a few challenges, I'm never one to shy away from trying new things. The first issue with the Military that I had to overcome was the nested liners, which while it reduces the weight of the knife to make it almost impossibly light, also proved to be a royal pain in the rear for me.
 I overcame the problem using my new mill and careful dremel work. While it's almost impossible to CNC this kind of thing, manually milling the slots necessary isn't too bad, it just requires some time and careful work. Once I had the nested liners in place, I milled my slots for inlay and ground down my red G10 to .245 inches, just ever so slightly thinner than the slots I made. Putting the slots .15 inches apart makes them look much better than my wider spaced earlier jobs.
 The thing about white G10, and let me just be blunt, is that it's a pain in the butt to work with. White G10 has the tendency to soak up dirt and debris from the shop and will discolor if you get dirty water or oil on it. As such until I finished the knife, I couldn't cool the G10, which made grinding the handle a rather cumbersome task. Still, once the G10 was sculpted I think it looks pretty good. While it may appear more off-white than snow white, it's a very bright titanium white that contrasts the blood red G10 very well.


Tuesday, April 19, 2011
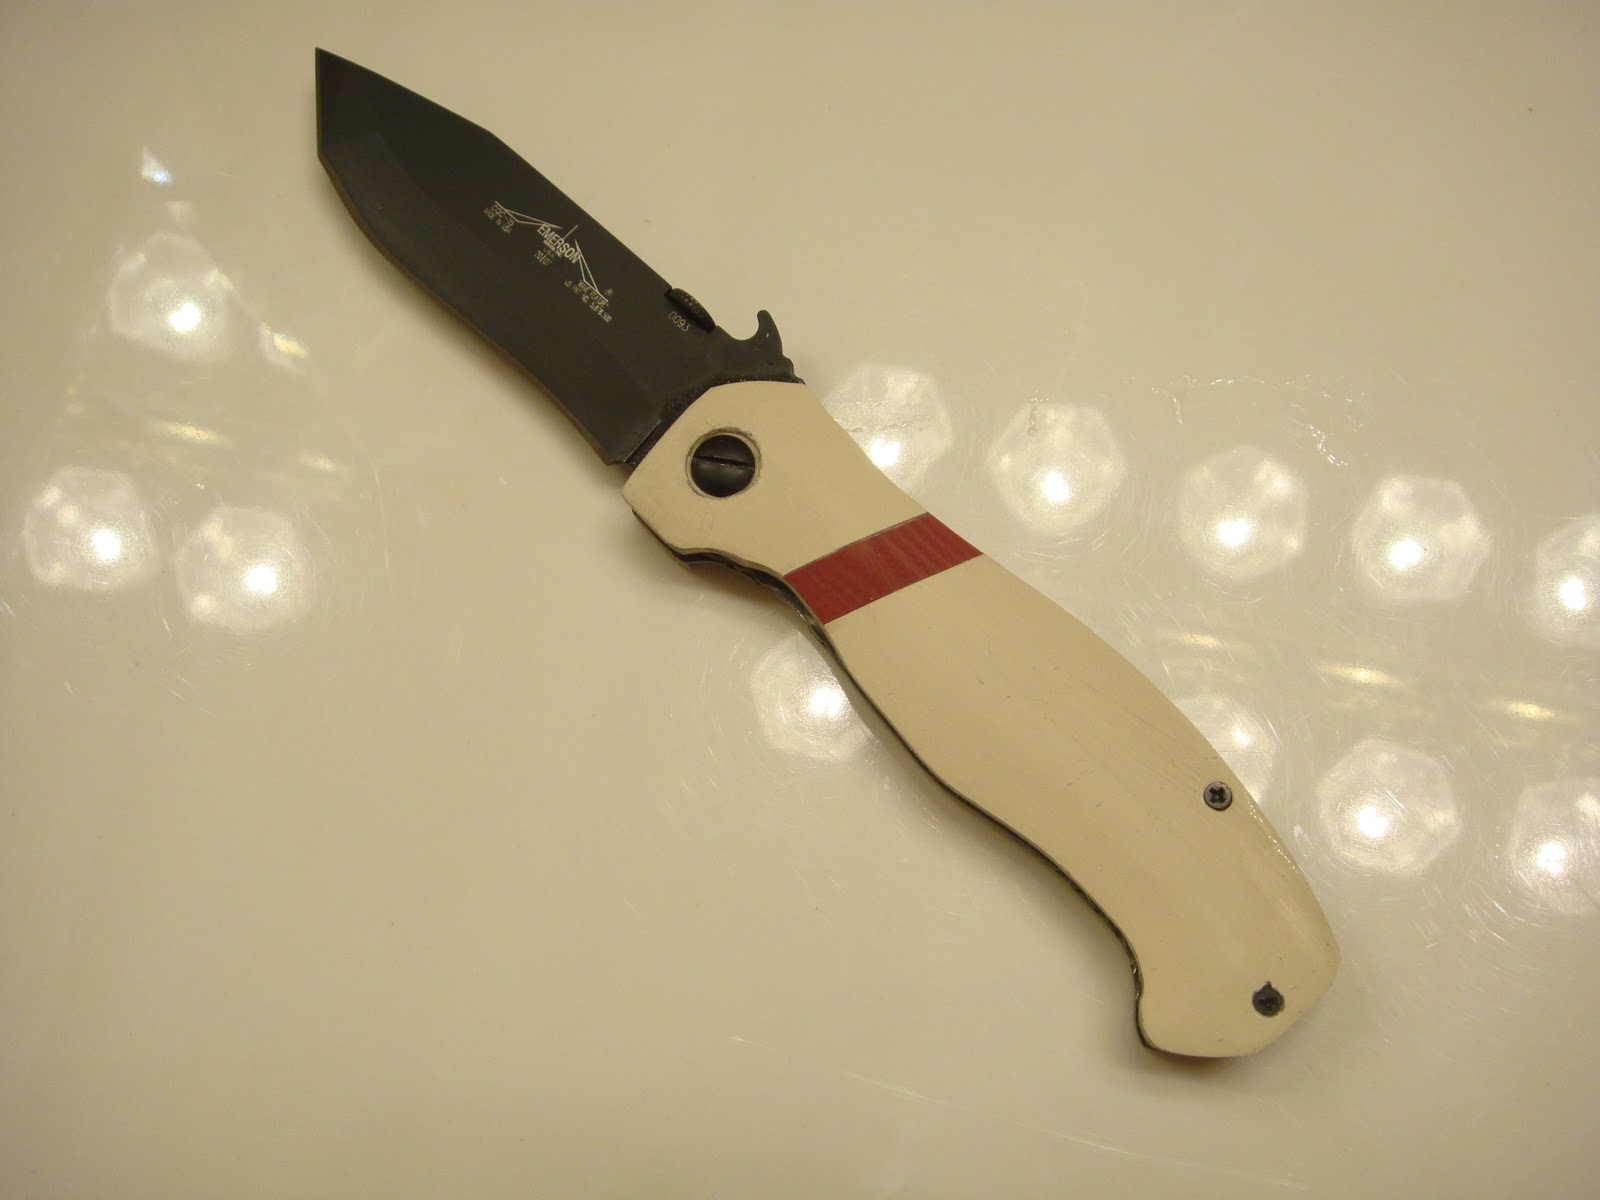
Monday, March 28, 2011
It's been a week or so since my last update, and this week I decided to try a couple new things. This is my third "pimped" Emerson knife, this time a CQC-15 I got on trade. The CQC-15 is pretty standard fare for Emerson fans although it has some improvements over the Endeavor, the last Emerson I worked on. For example, the liners are thicker, the ergos are well thought out and this particular CQC-15 had a well centered blade with a reasonably nice action on it.
That said, it still had those gorram nasty jean-killers that pass for G10 scales, and I just can't stand Emerson's scales from the factory. I took the opportunity to try out some recently acquired toys that I bought for my shop, namely my new Mill/Drill that allows me to make perfect slots in my scales so I can do inlay.

The shot above shows the first scale after I did all the rough work. The scale is made of paper Micarta and inlayed with a piece of blood red G10. For those who don't know, Micarta comes in several different flavors and they all have to do with what the case material is that's impregnated with resin. Paper Micarta is the finest of the Micartas and doesn't have a well defined grain structure. This makes it looks much more natural than the Linens and so it makes great faux Ivory. G10 of course is fiberglass imbedded in resin to make it stiff, and so shows a defined grain structure which makes for a nice contrast.

After making the initial bosses of the scales, I polished and jeweled the liners. This process is pretty time consuming but makes the overall appearance of the final knife very, very classy. Some people call jeweling "engine turning" in reference to how old engines were finished back in the "good old days". It takes some skill to make everything line up properly, but as you can see it came out great.

Next I did the rough grinding on the second matching scale. For my "racing stripe" scales I decided that I'd have a single racing stripe where the thumb-disk access is. I left the locking side scale blank as the pocket clip will lend good contrast when the knife is fully assembled and the stripe would make the knife look too busy.

Next we fit everything up. Here you can see my very dirt paw holding a partially assembled CQC-15. One very little known fact about this particular Emerson- despite Emerson's attempt to cheapen their knives accrossed the board, the CQC-15 still has two Ti liners. Very cool.

Here's the other side of the handle with the locking-side scale fitted.

Here we can see my preparations for backspacer mods. As you can see (or maybe you can't), I milled out portions of the original G10 backspacer to be filled with glow marble goop. At this point I hadn't decided on what color I'd use but later I went with Violet.

Finally, I had the knife assembled albeit a little dirty. A little cleaning and the knife was ready to be filled with glow goop. I decided to go with Violet for two reasons, the first being that I'd never used it before and wanted to see how it looked and the second because none of my other colors would look good (Green would make it look Italian, Turquoise would make it look like an Aquafresh toothpaste tube and blue would be a little too jingoistic). I reshaped the liners slightly to fit my hand better, sanded off any rough spots and the rest, as they say, is history:


Subscribe to:
Posts (Atom)